To set up Google Search Console, open Search Console, add a property for your website, and prove you own it. Choose a Domain property if you can add a DNS record (it covers every protocol and subdomain). Otherwise choose a URL-prefix property and verify with an HTML file, an HTML tag, Google Analytics or Google Tag Manager. After verification, submit your XML sitemap and add the people who need access.
Search Console is the official place to see how your site appears in Google Search: which queries show your pages, which URLs are indexed, and which technical problems Google has found. Adding a property does not change your rankings. Google's help page on adding a property is clear that it only lets you track performance and manage the health of the site.
This guide walks through the current setup steps, using Google's own documentation.
What do you need before you start?
You need a Google account, and you need a way to prove you control the site. That usually means access to DNS at your domain registrar, the ability to upload a file to the site root, or permission to edit the homepage HTML. If you already use Analytics or Tag Manager on the site, you can often verify a URL-prefix property with the existing tag, provided you can open that Analytics or Tag Manager account.
If someone else already verified the property, you do not need to add it again. Ask a verified owner to grant you access, as Google describes in its guide to managing users and permissions.
You will need access to DNS, the site files or an existing tag to complete verification. Photo: Annie Spratt, CC0, via Wikimedia Commons.
How do you add a property?
Open Search Console and sign in with the Google account you want to own the property.
Open the property selector at the top of any Search Console page and choose + Add property.
Choose a website property, then pick Domain or URL-prefix.
Enter the domain or the exact URL prefix, including the protocol for a URL-prefix property (for example https://www.example.com/).
Follow the verification steps in the window, then click Verify. If you cannot finish in one sitting, click Verify later, complete the technical step, then open the saved property and verify it.
Google's getting-started guide says a Google account is the only requirement to use Search Console, but you must verify ownership before you can see the data or take actions that affect how the site appears in Search.
Should you choose a Domain or a URL-prefix property?
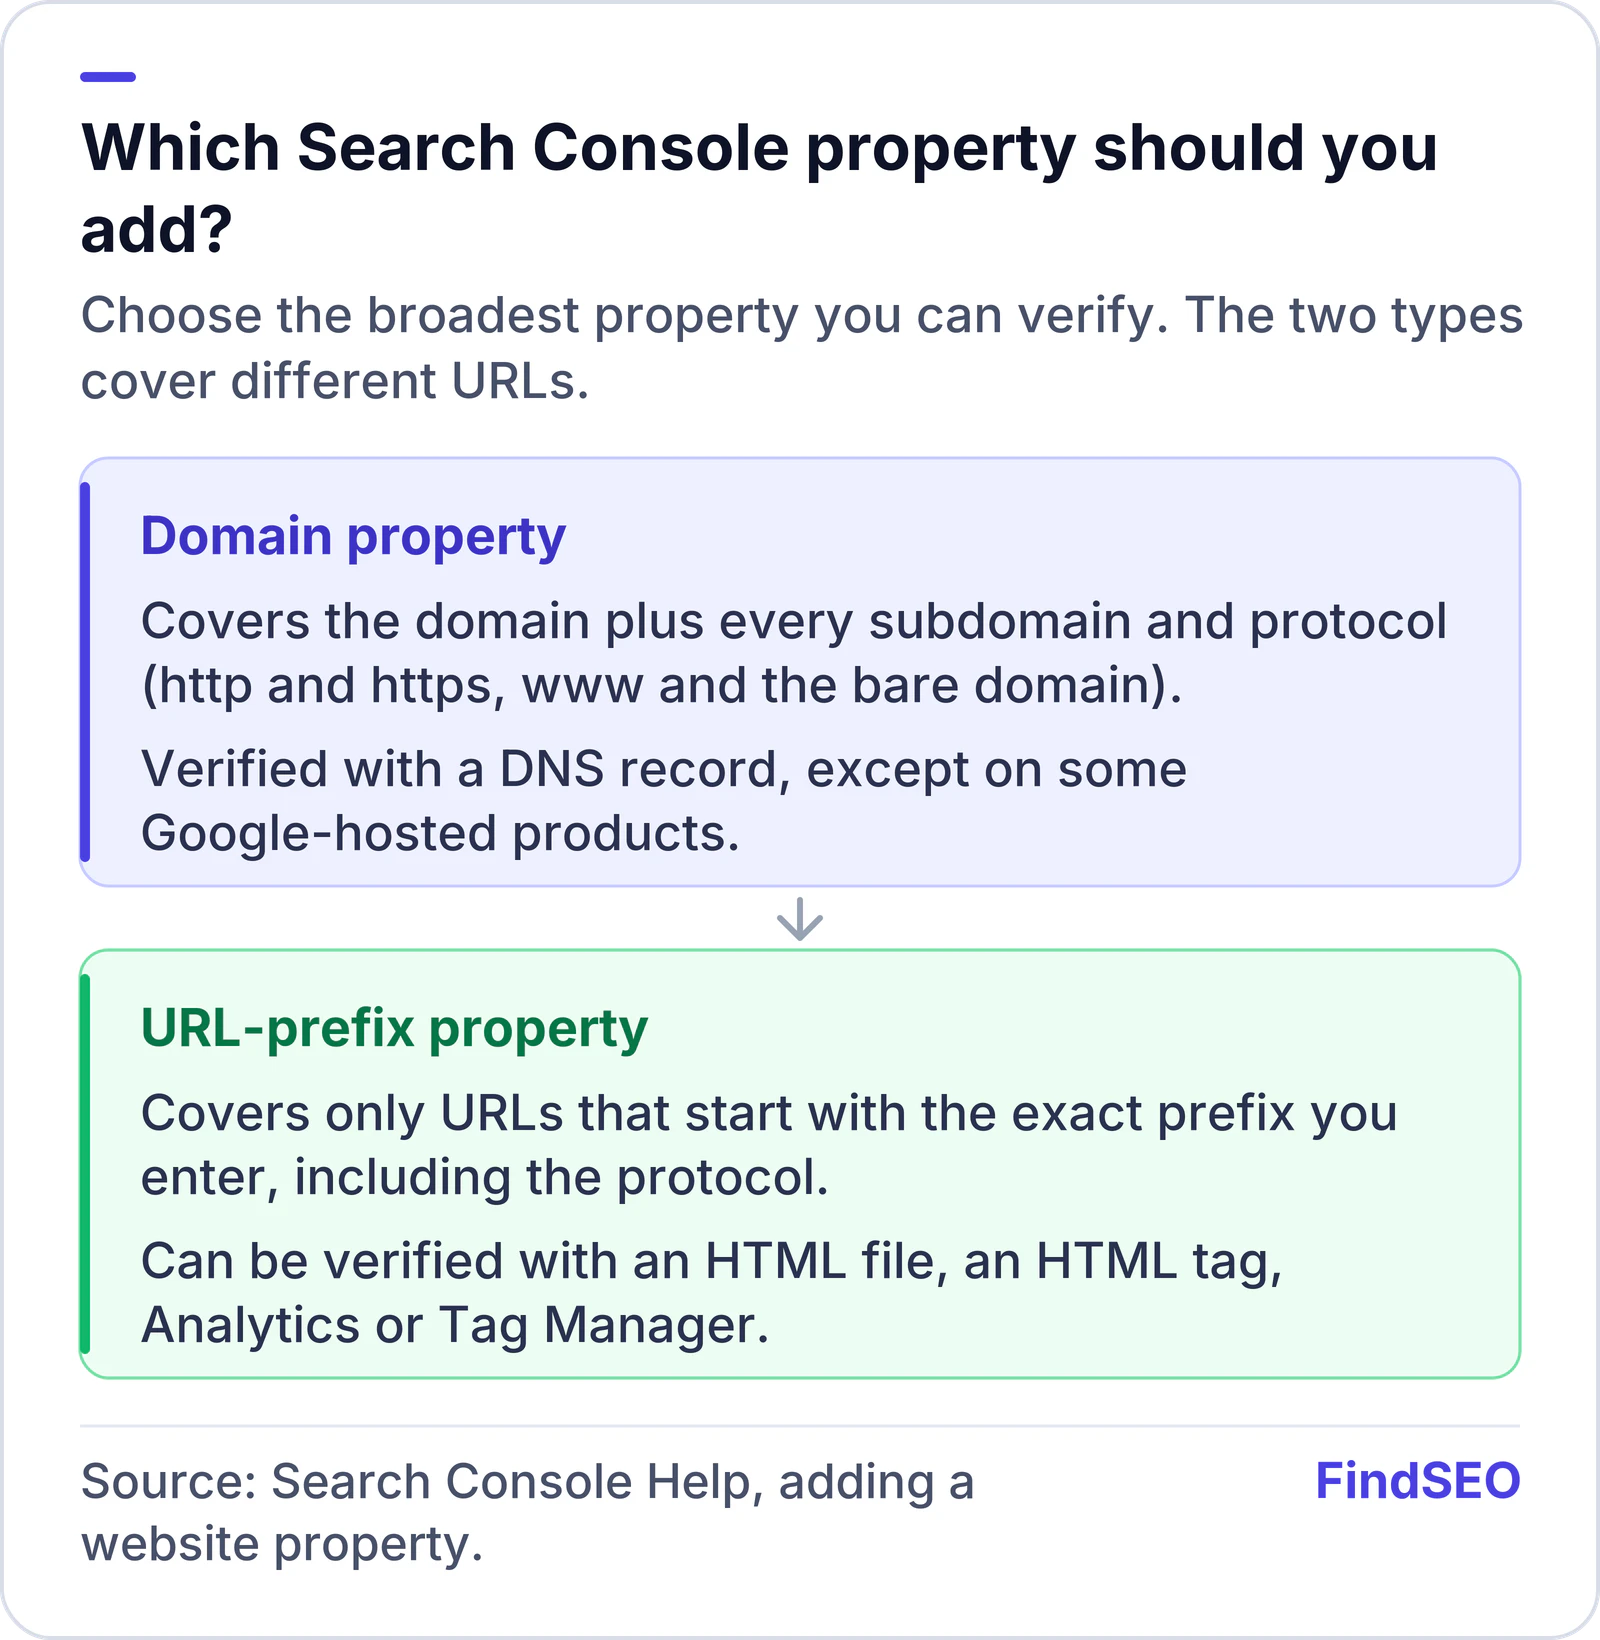
A Domain property covers the whole domain and every subdomain and protocol: http and https, www and the bare domain, and hosts such as m.example.com or shop.example.com. Google says this type requires DNS record verification, unless the site is hosted on a Google product such as Blogger or Google Sites.
A URL-prefix property covers only URLs that start with the exact prefix you enter. https://www.example.com/ does not include http://www.example.com/ or https://example.com/. That is useful when you only manage one section of a site (for example https://www.example.com/blog/), or when you cannot add a DNS record.
For most businesses that control the whole domain, a Domain property is the cleaner starting point. You can still add a URL-prefix property later if you want a tighter view of one host or folder.
A Domain property is broader; a URL-prefix property is narrower and has more verification options.
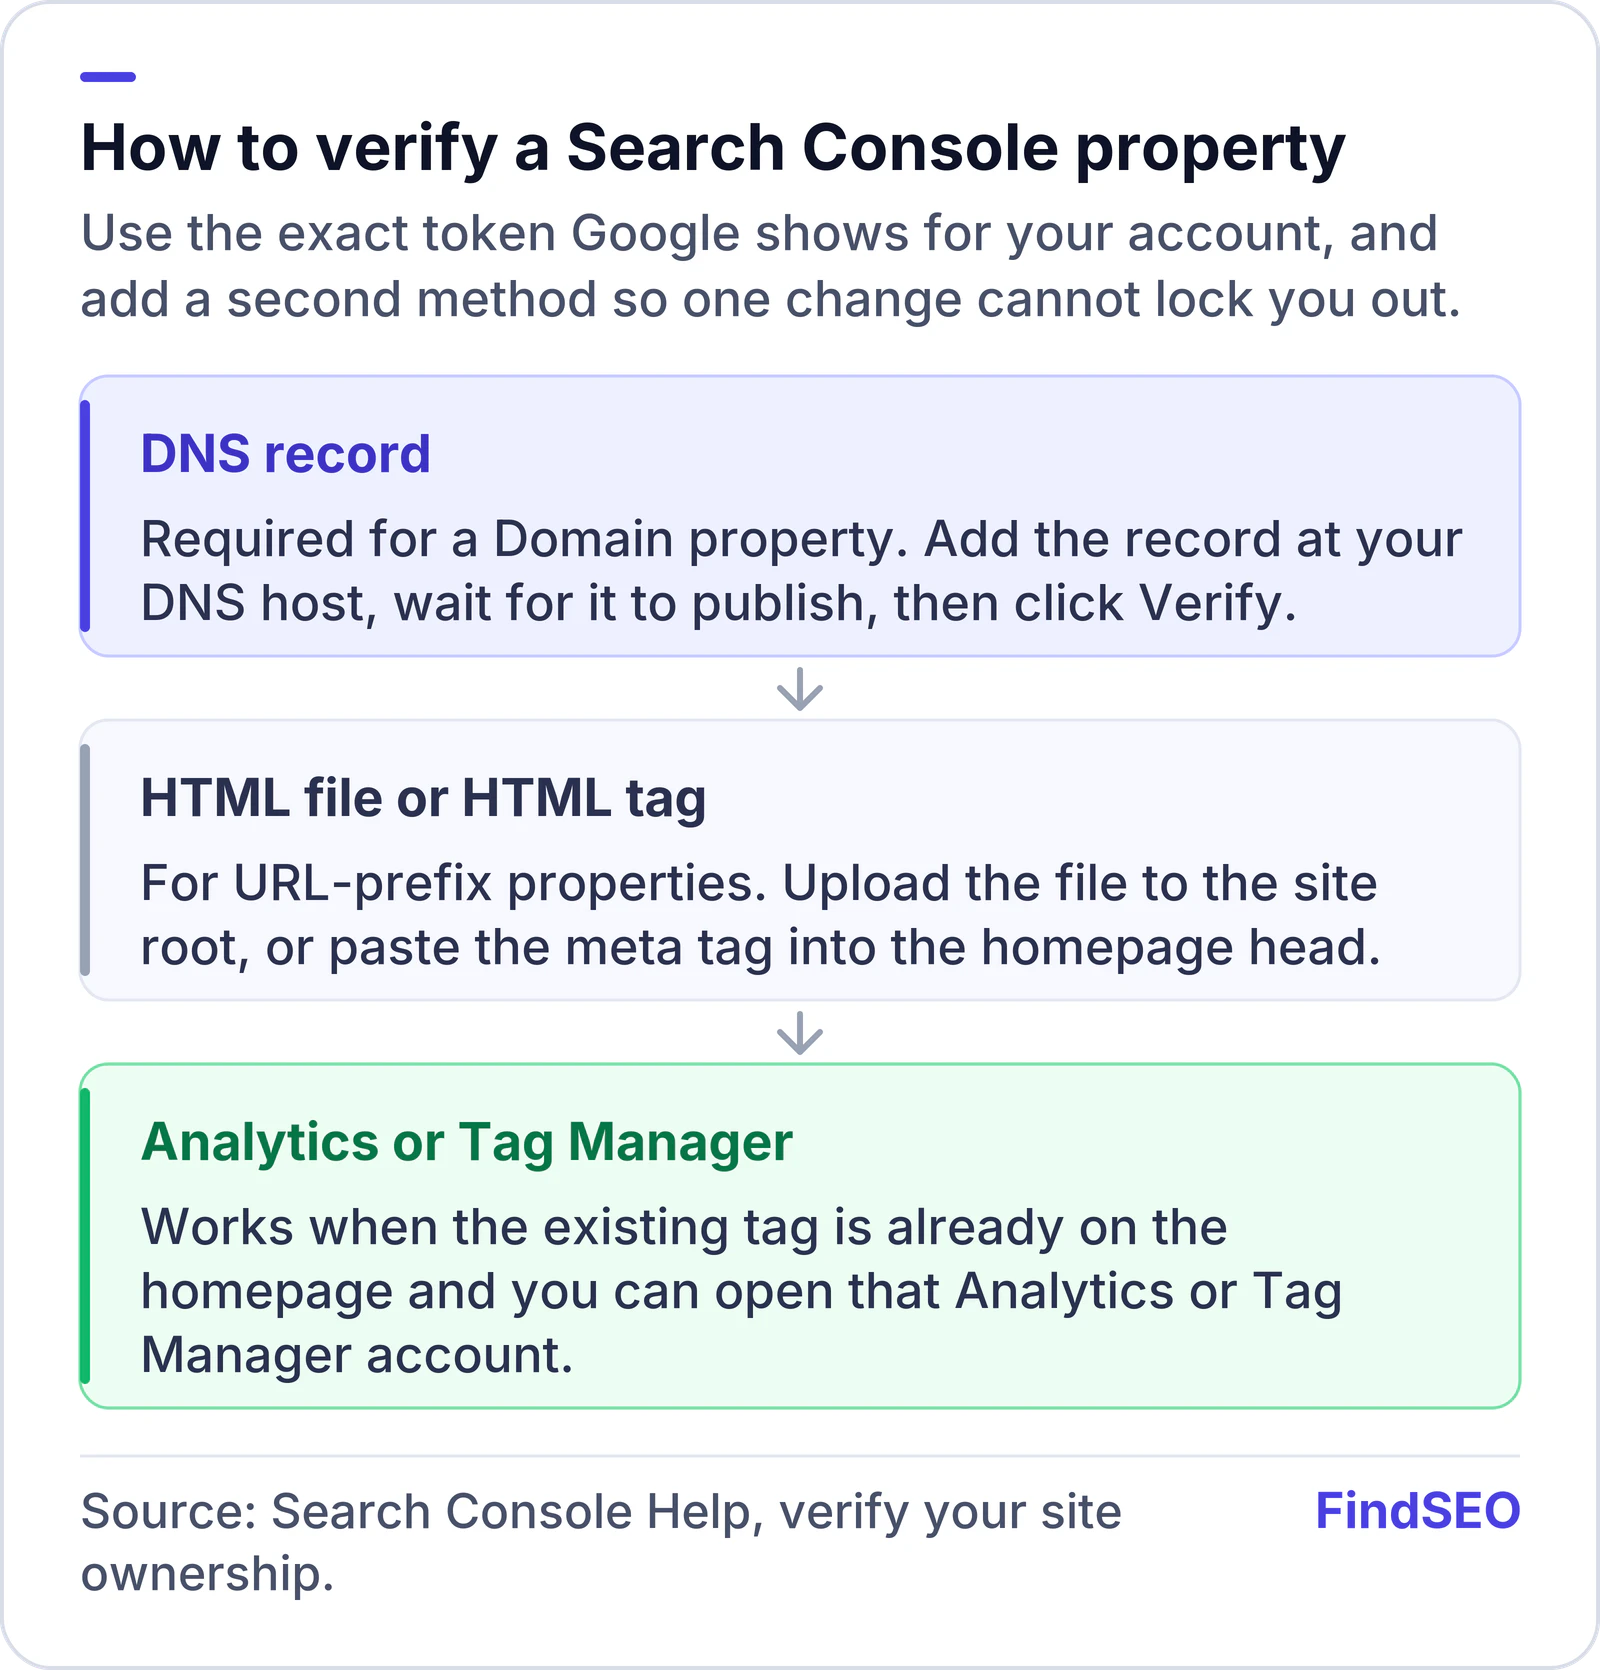
Add the TXT (or, where the wizard shows it, CNAME) record Google gives you at your domain registrar or DNS host, wait for it to publish, then click Verify.
You want one property that covers the whole domain.
HTML file upload
Upload the exact file Google provides to the site root, so it is reachable by a logged-out visitor, then click Verify.
You can publish a file at the root URL but not edit templates.
HTML tag
Paste the meta tag into the <head> of the homepage and publish it.
You can edit the homepage HTML.
Google Analytics
Use the Analytics tag already on the homepage, from an account you can access.
Use the Tag Manager snippet already on the homepage, from a container you can access.
You already installed Tag Manager.
Use the exact token Google shows for your account. Do not reuse someone else's file or tag, and do not overwrite another owner's token if several people are verifying the same property. Google recommends adding more than one method so you do not lose access if a template change removes a single tag.
Verification lasts only while Google can still find a valid token. Search Console checks periodically. If the token disappears, Google will notify you, and after a grace period your access can expire. Keep the DNS record or tag in place.
Pick the method you can complete today, then add a backup method in the property settings.
When will data appear, and what should you do next?
Google says data collection starts when anyone adds the property, even before verification, and that it takes a few days for data to accrue. If nothing appears after several days, check that you entered the right URL (especially http versus https on a URL-prefix property), and that the site is actually seen in Google Search.
Once the property is verified:
Submit your sitemap in the Sitemaps report. Paste the sitemap URL (often https://www.example.com/sitemap.xml) and click Submit. You will see when Google last read it and whether it found errors. Our guide to whether you need an XML sitemap covers what to list. Also add a Sitemap: line to your robots.txt file.
Add users who need access, using the permissions guide above. Give full users only to people who should see the data and request indexing. Keep owner access with someone who will stay at the business, not only with an outgoing contractor.
Open the Pages report and URL Inspection if a URL you care about is missing. Our guide to why a page is not indexed walks through the statuses. The Google Index Checker is a quick public check for a single URL.
After verification, submit the sitemap and add the colleagues who need access. Photo: Pixel.la, CC0, via Wikimedia Commons.
A Search Console setup checklist
You added a Domain property for the whole site, or a URL-prefix property that matches the exact live URL.
Ownership is verified, and the token (DNS record, file or tag) is still in place.
A second verification method is recorded on the property, so one change cannot lock you out.
The sitemap is submitted in the Sitemaps report and listed in robots.txt.
At least one person at the business is a verified owner, not only an agency account.
Users who need reports have been added with the right permission level.
You know where to inspect a single URL and how to read the Pages report.
The bottom line
Search Console does not rank your pages, but it is the official record of how Google Search sees them. Add the broadest property you can verify, leave the token in place, submit a clean sitemap and share access carefully. Once data is flowing, the Performance, Pages and Core Web Vitals reports become the starting point for most technical work. If you would rather have an agency set this up and keep an eye on the reports, compare technical SEO services, browse SEO agencies in Australia, or get matched with an agency.
FAQs
Does adding a site to Search Console help it rank?
No. Google's help pages say adding a property does not affect your website in Google Search. It only lets you track performance and manage site health. Rankings still depend on the pages themselves.
What is the difference between a Domain property and a URL-prefix property?
A Domain property covers the domain and all subdomains and protocols, and is verified with a DNS record. A URL-prefix property covers only URLs that start with the exact prefix you enter, including the protocol, and can be verified with an HTML file, an HTML tag, Google Analytics or Google Tag Manager.
How long does Search Console verification last?
Google says verification lasts as long as Search Console can confirm that your verification token is still present and valid. It checks periodically. If the token is removed and the issue is not fixed, your permissions can expire after a grace period.
When will I see data after I verify the site?
Google says data collection starts when anyone adds the property, even before verification, and that it takes a few days for data to start to accrue. If there is still no data after several days, check that the property URL is correct and that Google has seen the site in Search.
Can more than one person verify the same Search Console property?
Yes. Google says multiple people can verify the same property, using the same or different methods. If you use the same method, do not overwrite another owner's token. A current owner can also grant access without a new verification.